1.Product model
2. Specifications
3.2inch TFT screen
24V/36V/48V/52V battery supply
Rated operating current : 40mA
Off leakage current < 1uA
Max output current to controller : 100mA
Operating temperature : -20~70℃, Storage temperature : -30~80℃
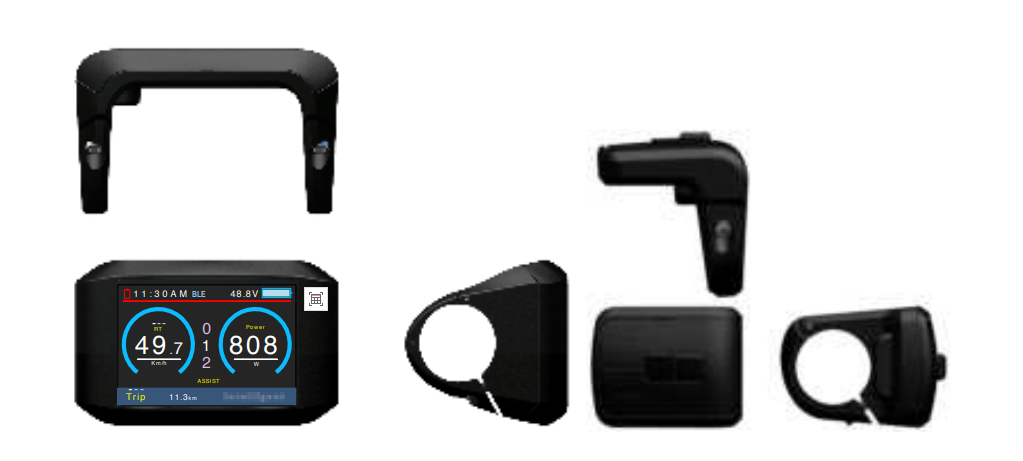
3.Dimensions and Material
Product shell is ABS, transparent window is made with high strength Acrylic.
Dimensions: host/L110mm*W68.2mm*H68mm
4. Features
- Suitable for low temperature, Max -20℃.
- High-contrast 3.2inch IPS colorful matrix screen.
- Ergonomic external button design, easy to operate.
- Speed display: AVG SPEED, MAX SPEED, SPEED (Real-time).
- Kilometer / Mile: Can be set according to customers’ habits.
- Smart battery indicator: Provide a reliable battery indicator.
- 9-level Assist : 3-level/5-level/9-level /UBE(6-level)optional.
- Mileage indicator: Odometer/ Trip distance/ Clock/ Riding time.
- Power indicator: real time power indicator, digital or analog.
- 6km walking
- Bluetooth & Mobile navigation
- Phone battery indicator
- Error code indicator.
- Software upgraded: Software can be upgraded through UART.
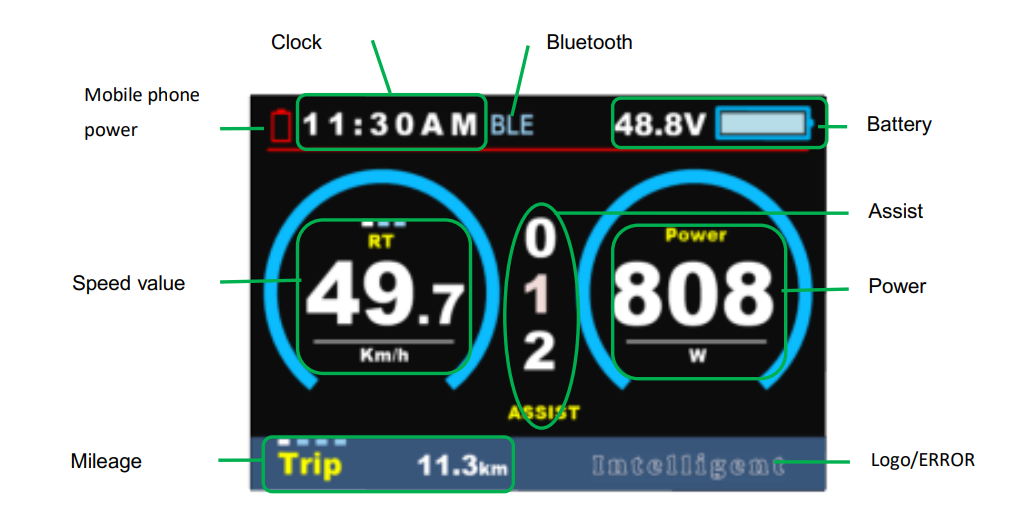
5.Main page
6.Functional Description
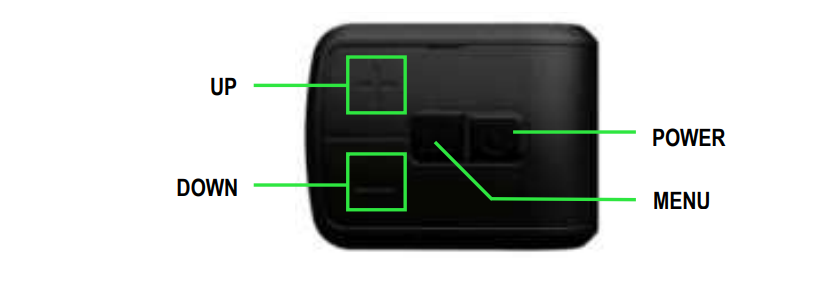
6.1 Power On/Off
Press POWER button for 2 seconds, you can turn on/off the display. The Display can automatically turn off when there is no operating and riding for 5 minutes. (Length of time can be set, refer to 8.1.4 ‘Auto off’)
Input pattern in first if pattern unlock was activated.
Display will be locked for 30 seconds after 3 times failed attempt.
6.2 Assist level
Press UP/DOWN button to change assist level, Top assist level is 9, 0 for neutral. Level quantities can be adjusted according to the customer requirements.

6.3 Speed & Mileage model
Short press MENU button can change the speed mode, Speed->AVG Speed->MAX Speed.
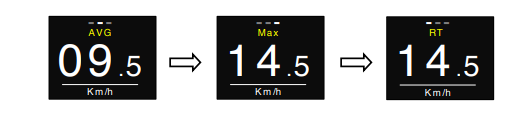
*If there is no operation for 5 seconds, display will return Speed (Real-Time) display automatically.
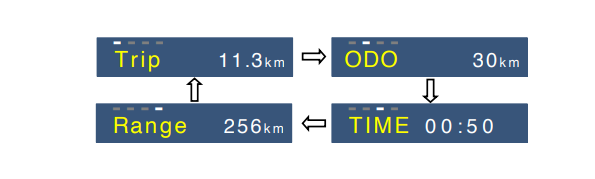
6.4 Mileage mode switch
Short press POWER button can change the mileage mode, Trip->ODO-> Time.
6.5 Headlight/backlight On/Off
Press and hold UP button for 2 seconds can turn on/off headlight, display will switch to the corresponding mode (Day or Night).
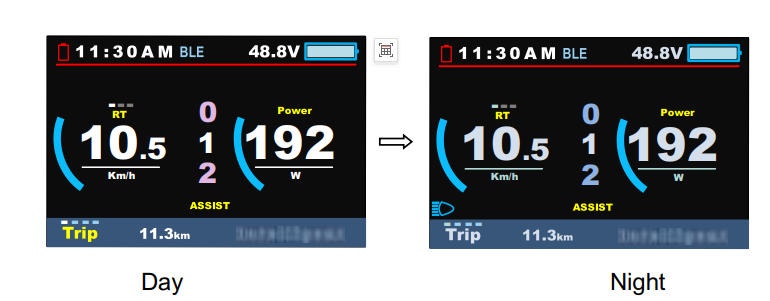
- The brightness of the Display can be set according to the user’s needs, Refer 8.1.3 Brightness.
- The motor does not work when the battery voltage is low, Display still can keep the headlight on for a while when E-bike is in riding.
6.6 Walking mode (6km)
Press and hold DOWN button for 2 seconds can get into walking mode, show ‘P’ on screen, out of walking mode when releasing button.
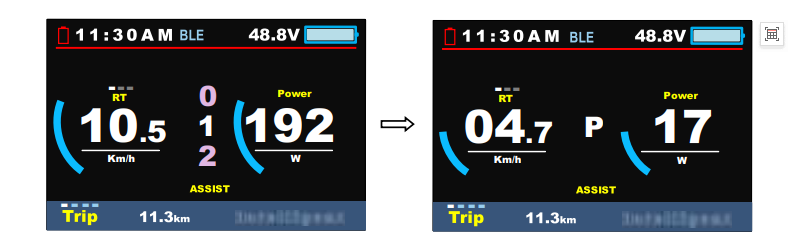
* This feature needs to be supported by controller.
6.7 Bluetooth & mobile navigation
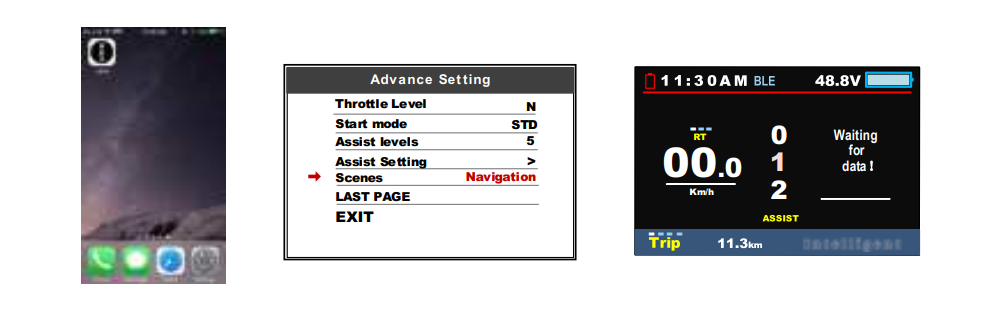
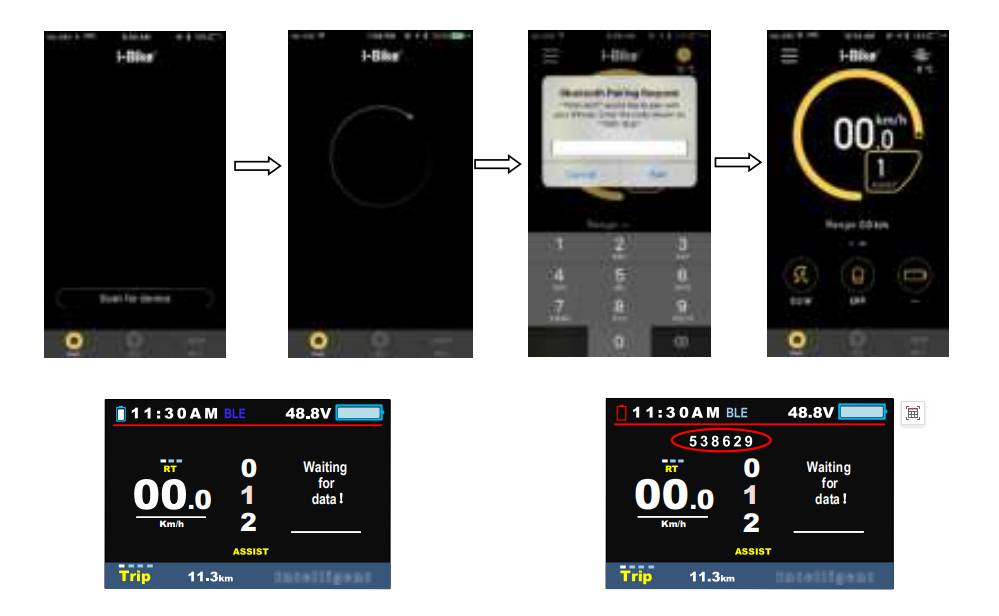
6.7.1 Connection preparation
After installing the I-bike mobile app, turn on the Bluetooth function of the mobile phone, open the I-bike app, set the Scenes item in the instrument menu settings to “Navigation”, click Search for device, the Meter name defaults to APTTEST, and the icon is red, the icon BLE is light blue (unconnected state).
6.7.2 Connect the phone and meter:
Find the meter by mobile phone, search for the meter name “APTTEST”, click search the device, input these digits in the mobile phone when the 6 digits appear on the meter, click pair and after the successful pairing, the main interface of the mobile phone displays the I-bike information interface of the meter, and the MAIN interface, the navigation interface (Navi) and the more information interface (More). The meter displays the battery indicator of the phone, and the icon BLE is dark blue (connected).
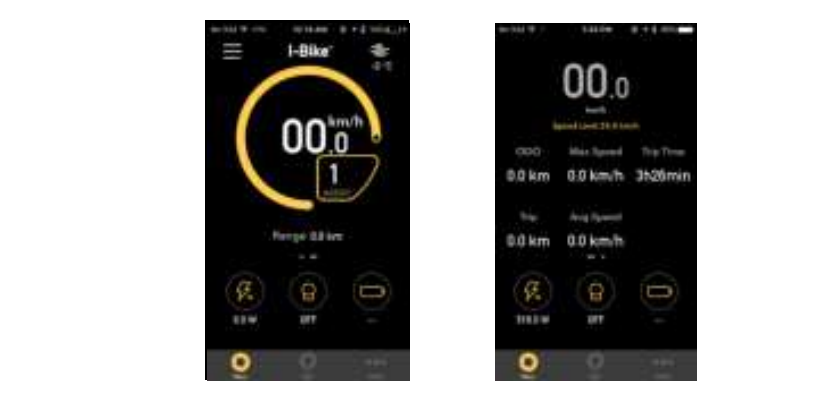
6.7.3 Mobile I-Bike main interface display
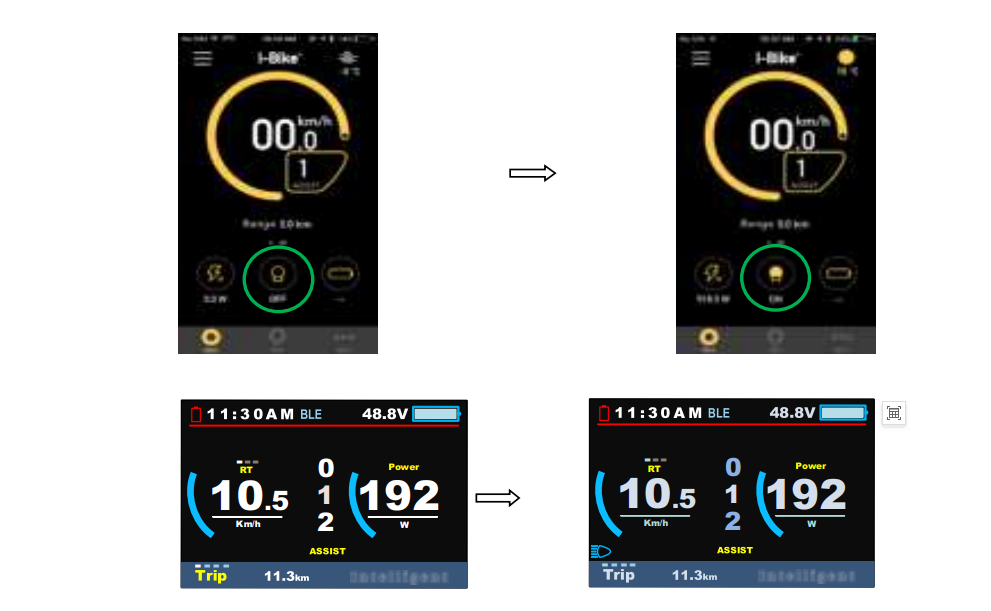
Headlight/backlight On/Off
Click the main interface to switch OFF/ON can turn on/off the headlight (controller is required to support) and the screen will switch to the corresponding mode.
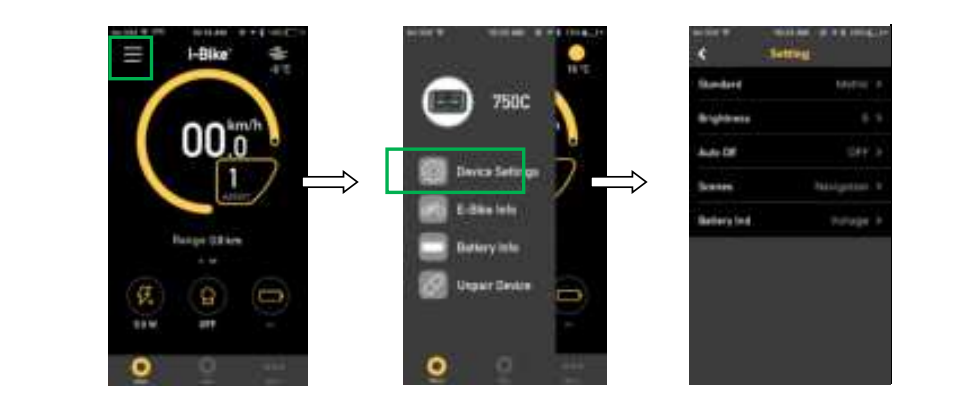
Device Settings
Click on the top left corner of the mobile screen, enter Device Settings, you can set the meter parameters: Standard, Brightness, Auto Off, Scenes, Battery Ind.
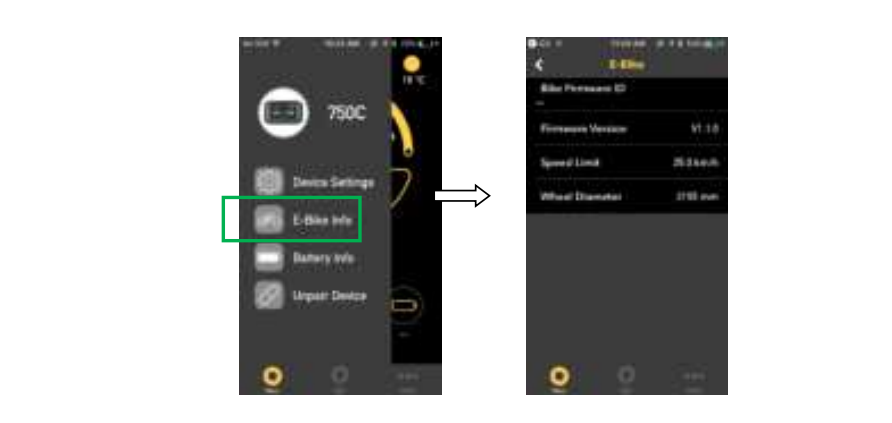
E-Bike Info
Click into E-Bike Info interface, display Bike Firmware ID, Firmware Version, Speed Limit, Wheel Diameter.
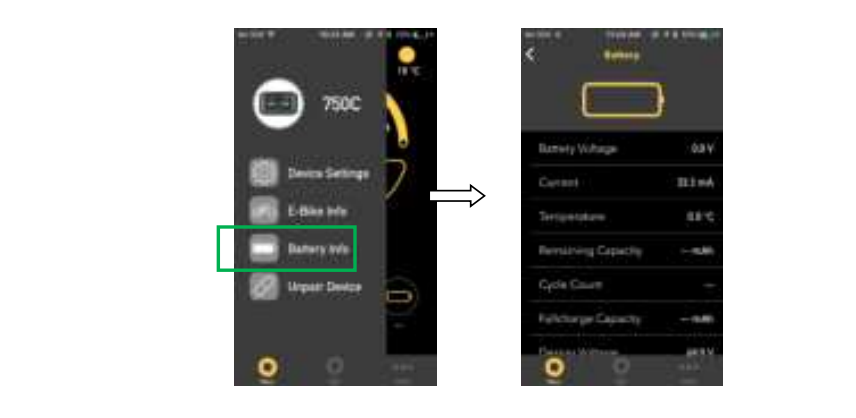
Battery Info
Click into the Battery Info interface, can show information of battery, including Voltage, Current, Temperature, Remaining Capacity, Cycle Count, Fullchharge Capacity, and Design Voltage.
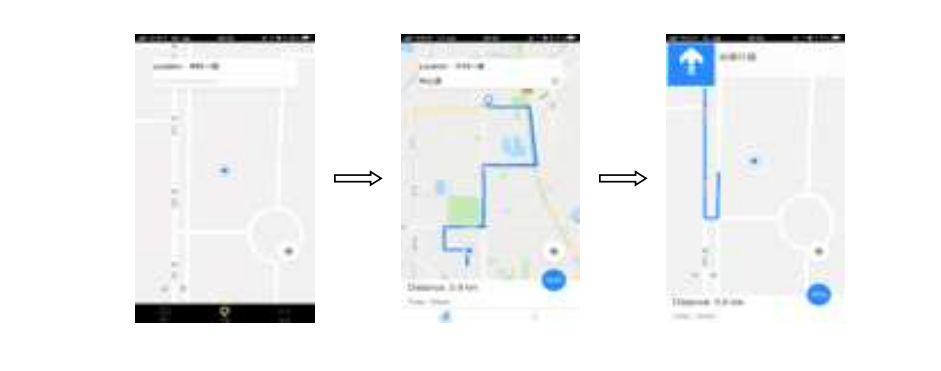
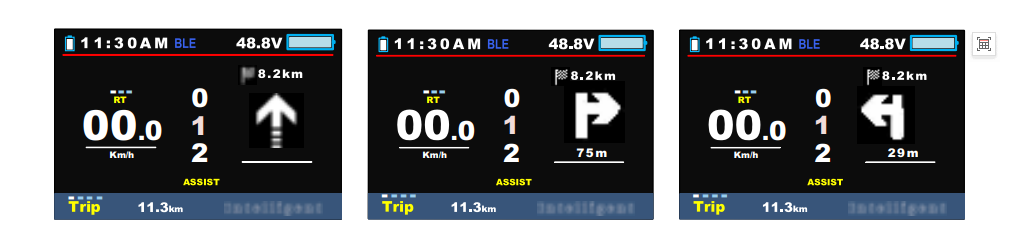
6.7.4 Navi
In the mobile navigation interface, enter Location and choose destination, then the mobile phone displays the map navigation path, distance and usage time information. After clicking start, the meter displays the navigation icon, or and distance information.
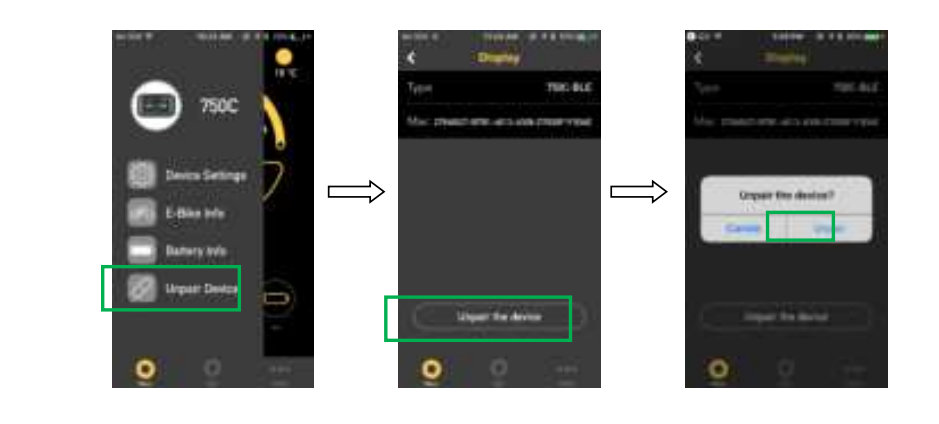
6.7.5 Unpair Device
Back to the main interface, enter the Unpair Device interface, click “Unpair the Device”, and click Unpair to remove the Bluetooth binding between the meter and the phone.
6.8 Data cleanup
Press and hold UP & DOWN buttons together for 1 second can reset several temporary data, temporary data include AVG Speed / MAX Speed / Trip / Time.
These temporary data can’t be erased by power off.
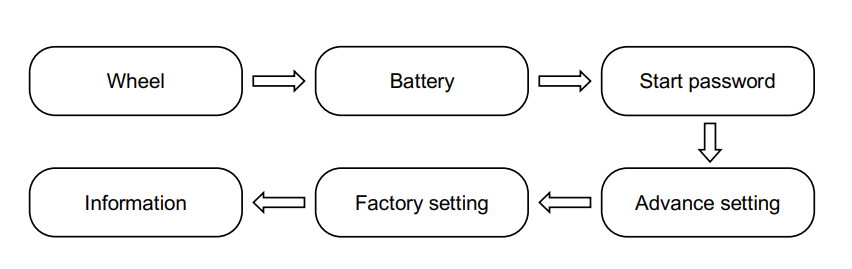
7. Parameter setting
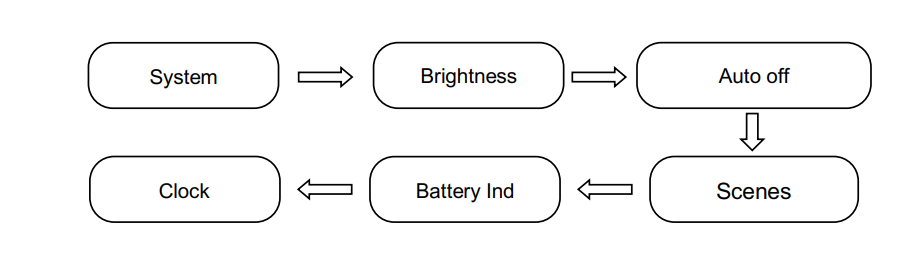
Double press MENU button (press interval less than 0.3 second) can get into setting menus, press POWER button to change Display Setting / Basic setting, press UP/DOWN buttons to change the parameter setting, press MENU button can switch to next item. Double press MENU button will exit from menu.
* Display will automatically quit menu when there is no operation for 30 seconds.
* For safety reasons, display can’t get into MENU when riding.
* Display will quit MENU when start riding.
7.1 Display settings
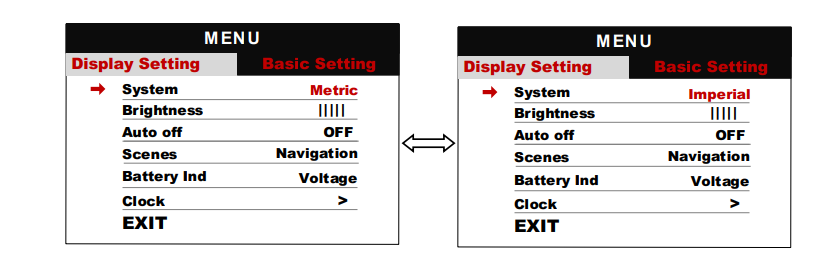
7.1.1 System
Press Up / Down button to switch between Metric / Imperial.
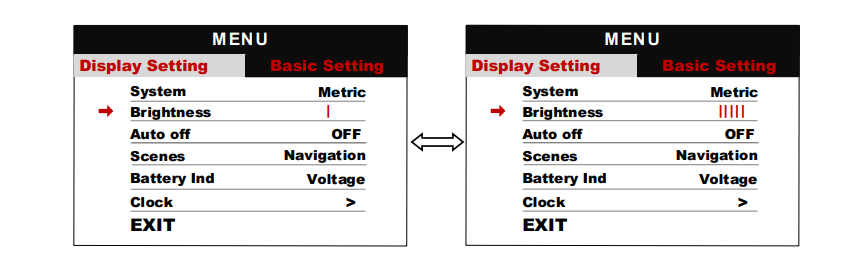
7.1.2 Brightness
Press Up / Down button to change the brightness of the backlight, ׀ is darkness,׀׀׀׀׀ is brightness. The daytime mode defaults to ׀׀׀׀׀ ,and the night mode defaults to ׀׀.
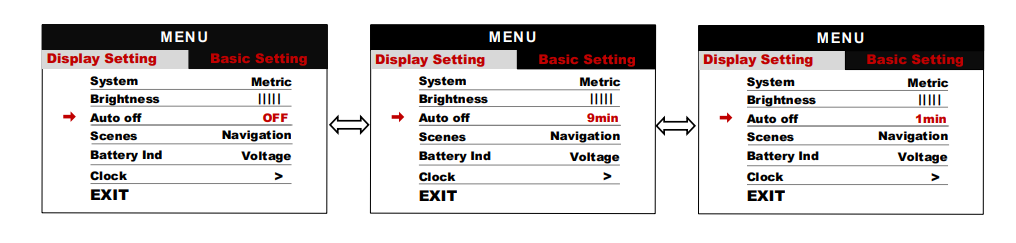
7.1.3 Auto off
Press UP/DOWN button to change the auto power off time, from 1 to 9 or OFF, the number represent time (minutes) to shutdown, default value is 5 minutes.
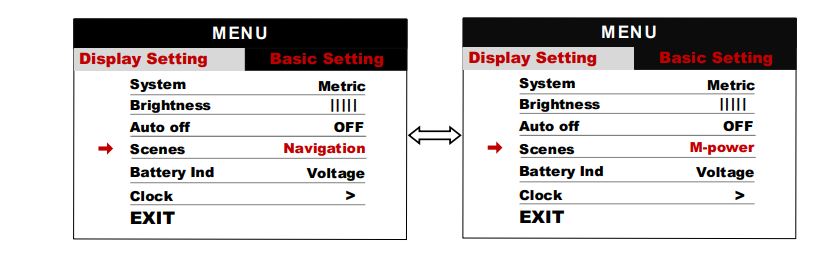
7.1.4 Scenes
Press UP/DOWN button to change the scenes, Navigation / M-power.
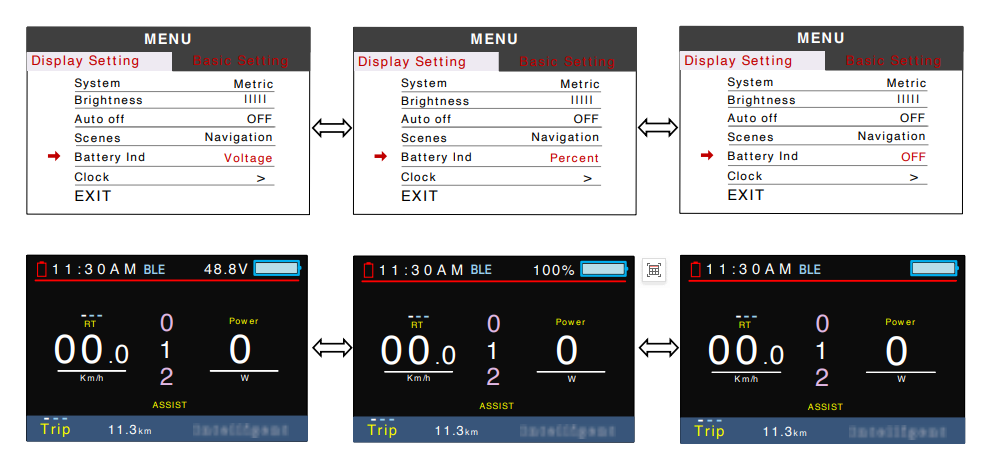
7.1.5 Battery Ind
Press UP/DOWN button to change the battery indicator, Voltage / Percentage / OFF.
*Accurate percentage needs communication with battery.
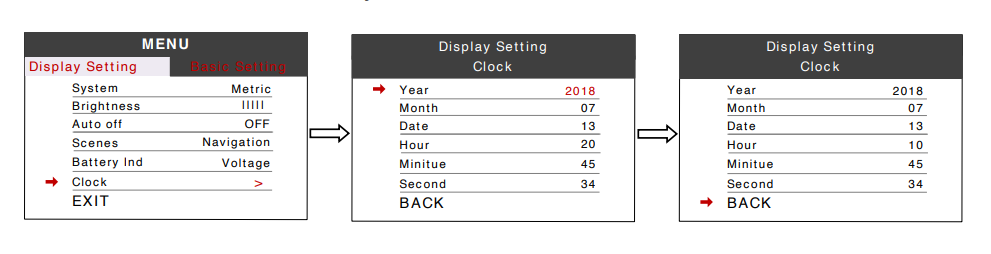
7.1.6 Clock
Clock setting, press MENU button get into the clock setting menu, press UP/DOWN button to set Year/Month/Day/Hour/Min/Sec.
7.2 Basic Setting
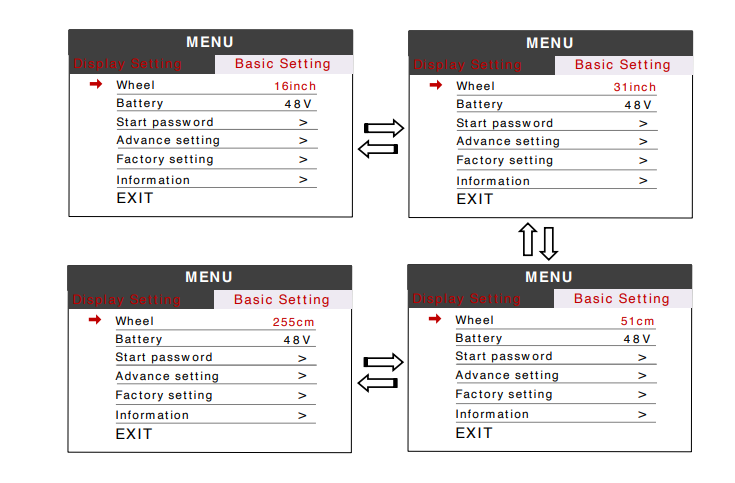
7.2.1 Wheel
Press UP/DOWN can change the wheel setting, optional wheel diameter is 16/18/20/22/24/26/27/27.5/28/29/30/31 inch, 51cm~255cm represent wheel circumference (this needs controller support).
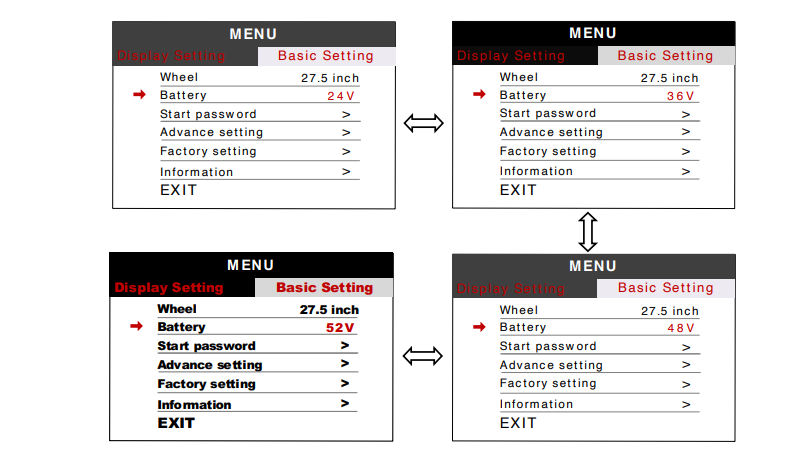
7.2.2 Battery
Press UP/DOWN will change battery voltage setting, optional value is 24V/36V/48V/52V.
7.2.3 Start password
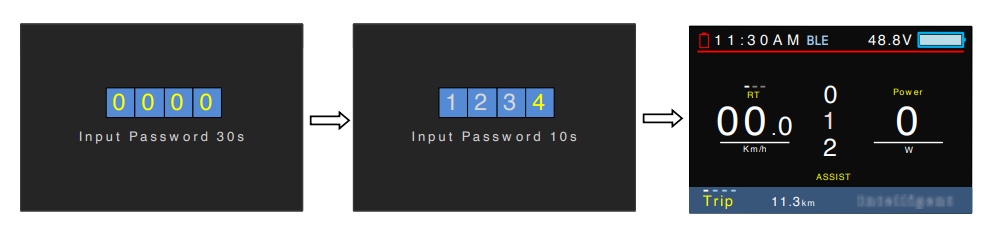
This item can protect e-bike system from unauthorized use. Press MENU button get into the password setting menu. If you had set Start input ON, you must input right password before power on, password is accorded to your setting.
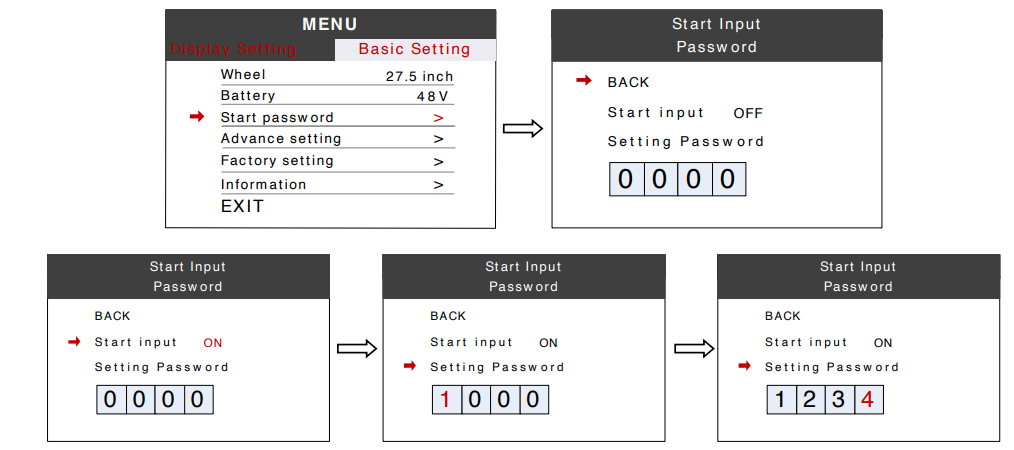
There are two ways to unlock display when Start Password had been activated.
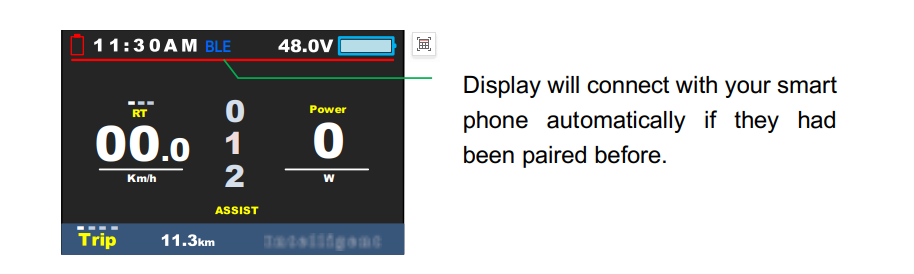
Bluetooth unlock: If you had paired smartphone with 750C already, 750C will skip the start password by Bluetooth connection.
Input preset password: Please input preset password in 30 seconds, display will power off automatically if the password was wrong for three times.
7.2.4 Advance setting
Press MENU button can get into the advance setting menu, default password is ‘1919’.
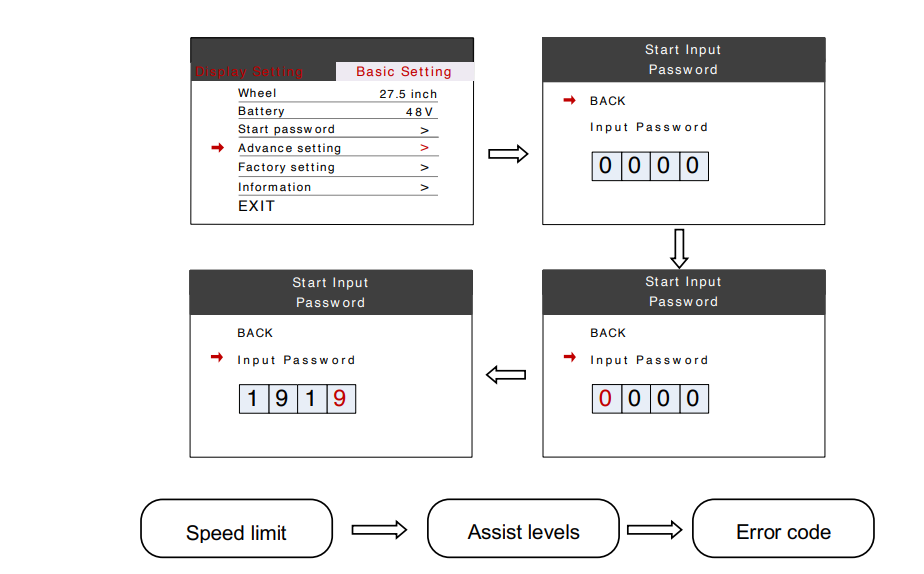
Speed limit : Press UP/DOWN will change speed limit, range 10km/h~99km/h. Default value is 25km/h.
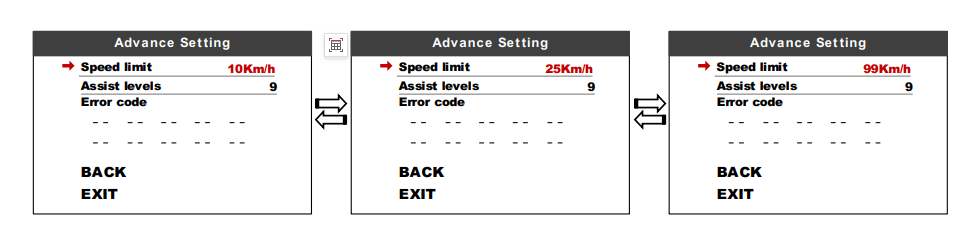
*Speed limit and current limit are restricted by controller and motor.
Assist levels : This parameter can customize assist levels, options are 3/5/9/6.
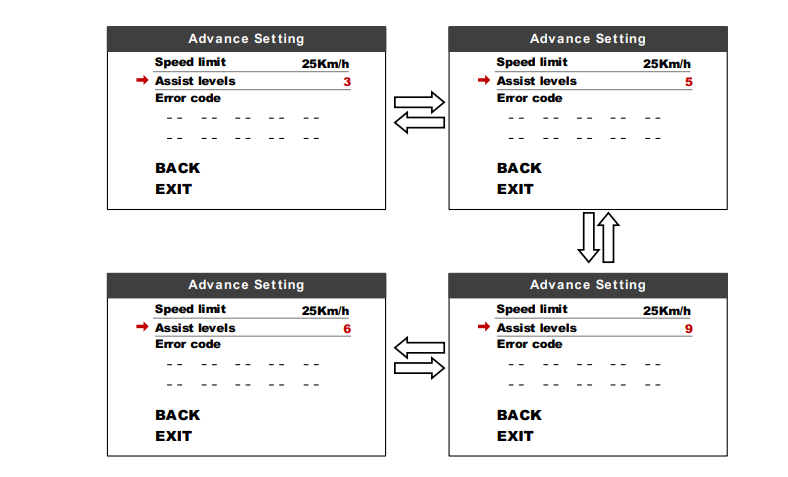
Error code: Error messages can be displayed. Select Back to return to Advance Setting.
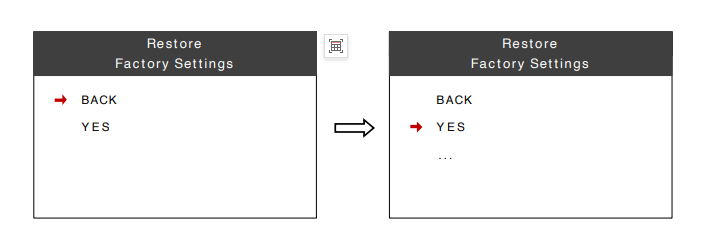
7.2.5 Factory setting
Press MENU button enter Restore Factory Settings item, set YES will restore all parameter to factory settings.
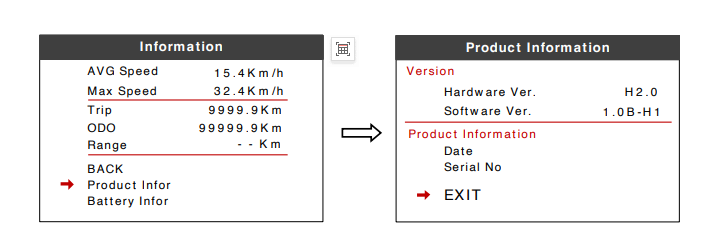
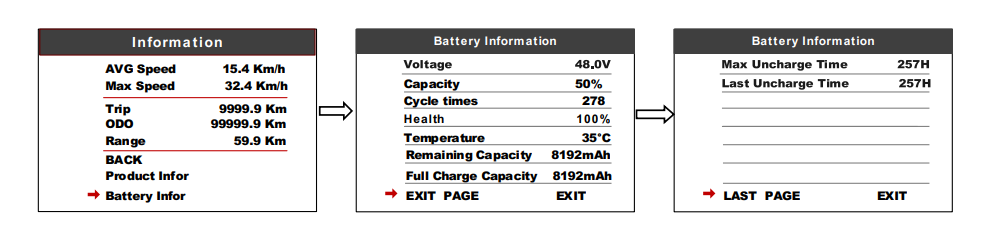
7.2.6 Information
Show information of the E-bike.

Product info: Get into this item can show hardware version software version…
Battery info : Get into this item can show all information of battery, including Voltage, Capacity, Cycle times, Health, Temperature of battery, Remaining Capacity, Full Charge Capacity, Max Uncharge Time, Last Uncharge Time.
*These information needs to be supported by battery communication.
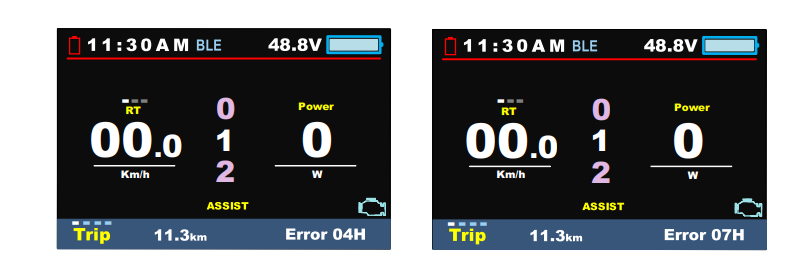
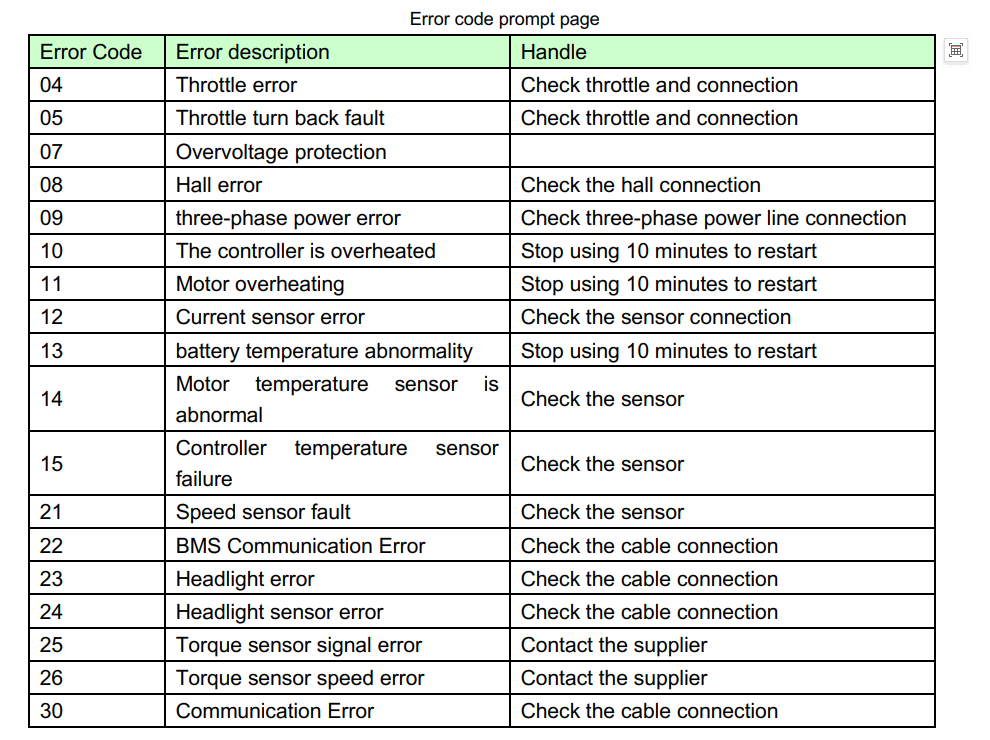
8. Errors code
Display shows warning message, icon shows on the screen, and show error code at the bottom of the screen, error code from 04~30, definition see the table below.
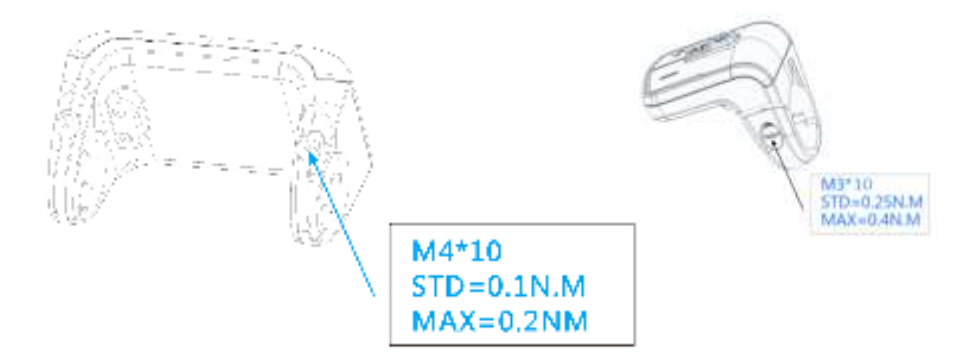
10. Assembly instructions
Please pay attention to the torque value, exceeding the maximum torque can damage the part. Electrical or pneumatic tools is not recommended.
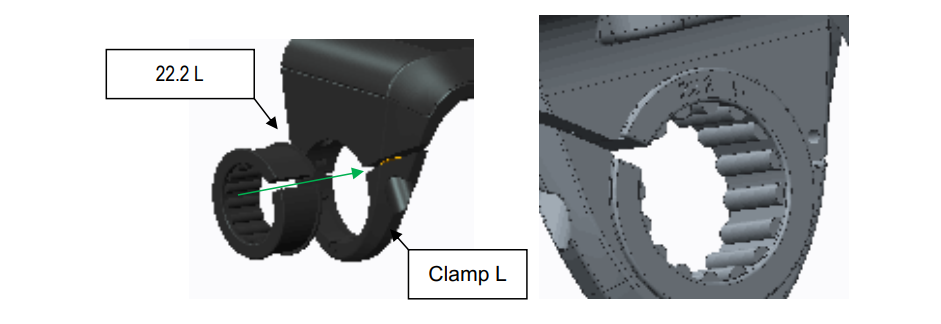
Clamps suit for 3 sizes of handlebar, 31.8mm, 25.4mm, 22.2mm, there are transfer rings for 25.4mm and 22.2mm(marked with L or R), transfer ring must be assembled with the special directions, pay attention to the green arrow below.
11. Install and use precautions
Do not adjust viewing angle before loose the screws.
