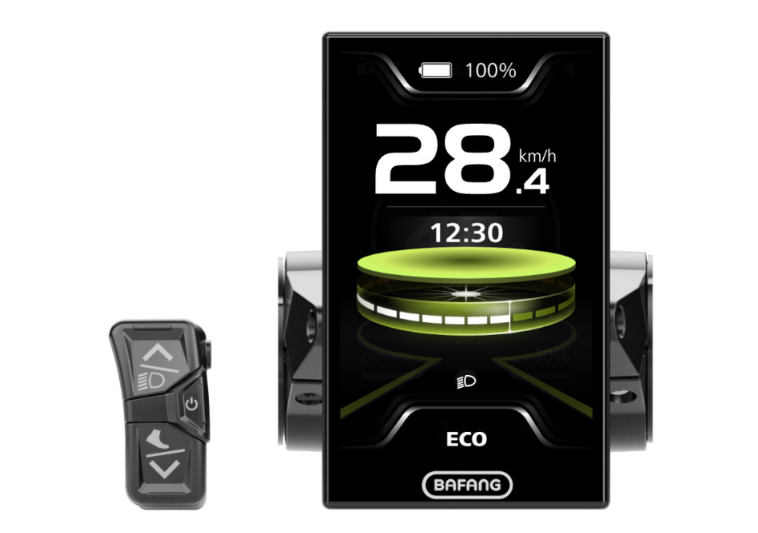
BAFANG DPC010 Display
Specifications
Display Model: DPC010
Real-time Speed Display
Power-assisted Mode Indication
Multiple Functional Indicators (Clock, Trip, ODO, MAX, AVG, Range, CAL, Cadence, Time)
Key Definitions for Headlight, Walk Assistance, Power On/Off
Product Usage Instructions
Introduction of Display:
Keep the QR code label attached to the display cable for possible software updates in the future.
Product Description:
The display features real-time speed display, power-assisted mode indication, and various functional indicators such as clock, trip, and more.
Display:
The display shows SOC indication, warn code indication, speed bar, power-assisted mode indication, unit of speed, multifunction indication, and icon indication.
Key Definition:
The keys are defined for headlight control, walk assistance activation, and power on/off functionality.
Normal Operation:
Power On/Off: Press and hold the power button for more than 2 seconds to turn on the display; press and hold again to turn it off.
Power-Assisted Mode Selection:
Press or hold the designated buttons to control the headlight and backlight brightness levels.
Walk Assistance:
Walk assistance function can only be activated when using a standing e-bike.
FAQ
How do I activate the walk assistance feature?
The walk assistance feature can be activated when using a standing e-bike by briefly pressing the designated button.
IMPORTANT NOTICE
- If the error information from the display cannot be corrected according to the inst-ructions, please contact your retailer.
- The product is designed to be waterproof. It is highly recommended to avoid submerging the display under water.
- Do not clean the display with a steam jet, high-pressure cleaner or water hose.
- Please use this product with care.
- Do not use thinners or other solvents to clean the display. Such substances can damage the surfaces.
- Warranty is not included due to wear and normal use and aging.
- Any changes or modifications not express-ly approved by the party responsible for compliance could void the user’s authori-ty to operate the equipment.
- This device complies with part 15 of the FCC Rules. Operation is subject to the following two conditions:
- (1)This device may not cause harmful interference
- (2)this device must accept any interference received, including interference that may cause undesired operation.
- This equipment has been tested and found to comply with the limits for a Class B digital device, pursuant to Part 15 of the FCC Ru-les. These limits are designed to provide reasonable protection against harmful interference in a residential installation. This equipment generates uses and can radiate radio frequency energy and, if not installed and used in accordance with the instructions, may cause harmful interference to radio communications. However, there is no guarantee that interference will not occur in a particular installation. If this equipment does cause harmful interference to radio or television reception, which can be de-termined by turning the equipment off and on, the user is encouraged to try to correct the interference by one of the following measures:
- (1) Reorient or relocate the re-ceiving antenna.
- (2) Increase the separation between the equipment and receiver.
- (3) Connect the equipment into an outlet on a circuit different from that to which the recei-ver is connected.
- (4) Consult the dealer or an experienced radio/TV technician for help.
INTRODUCTION OF DISPLAY
Model: DP C010.CN
The housing is made of PC+ABS; the LCD display windows is made of tempered glass; the button is made of ABS:
The label marking is as follows:
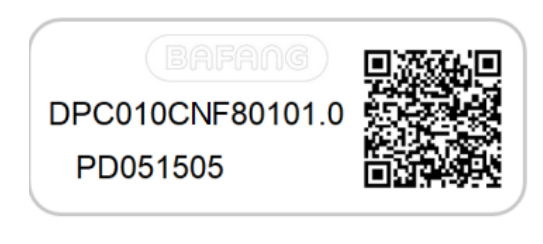
Note: Please keep the QR code label attached to the display cable. The information from the Label is used for a later possible software update.
PRODUCT DESCRIPTION
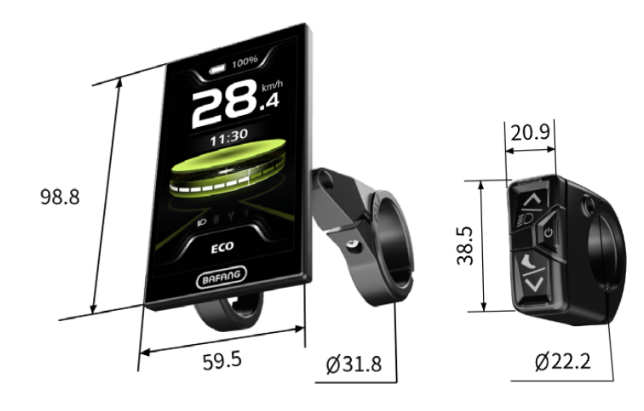
Specification
4.0“, 480*800 (RGB) TFT screen
Power supply: 36/43/48/50.4/60/72Vdc
Operating temperature: -20℃~45℃
Storage temperature: -20℃~60℃
Waterproof: IP66
Storage Humidity: 30%-70% RH
Functional Overview
Battery indicator
Power-assisted mode selection
Speed indication (including the max. speed and average speed)
Unit switching between km and mile
Motor power indication
Trip/ODO/Range indication
Walk assistance
Automatic sensors explanation of the light-ing system
Brightness setting for backlight
Intelligent indication (including energy con-sumption CAL and Cadence, only when the matching controller supports this function)
Information of controller, HMI and battery
Error code and warn code indication
Bluetooth
USB charge (max. charge current: 1A)
Navigation mapping
Service indication
Clock indication
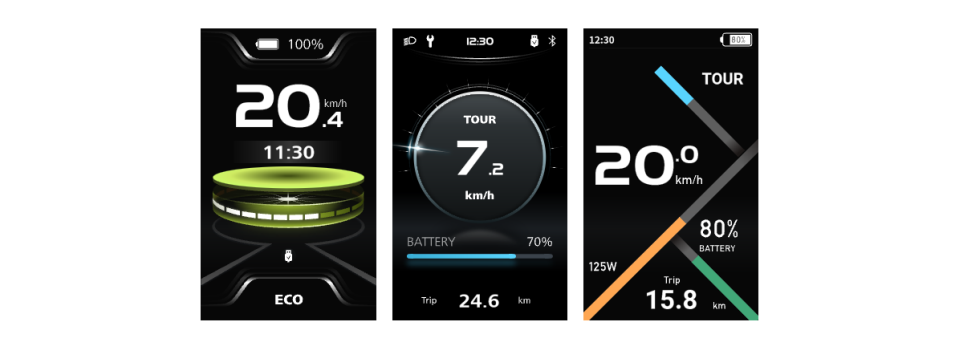
3 Themes (Sporty, Fashion, Technology)
6 Languages (English, German, Dutch, French, Italian, Czech)
DISPLAY
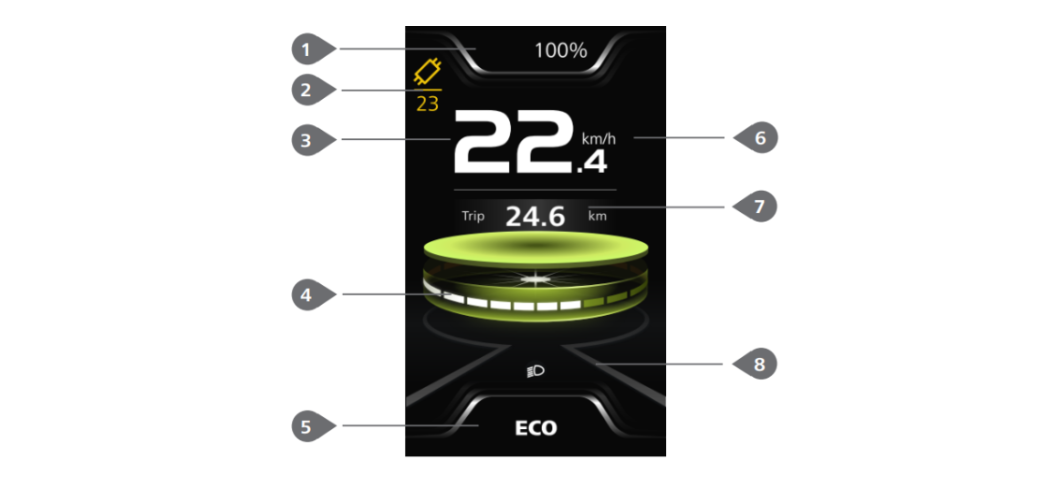
- SOC indication
- Warn code indication
- Real-time speed
- Speed bar
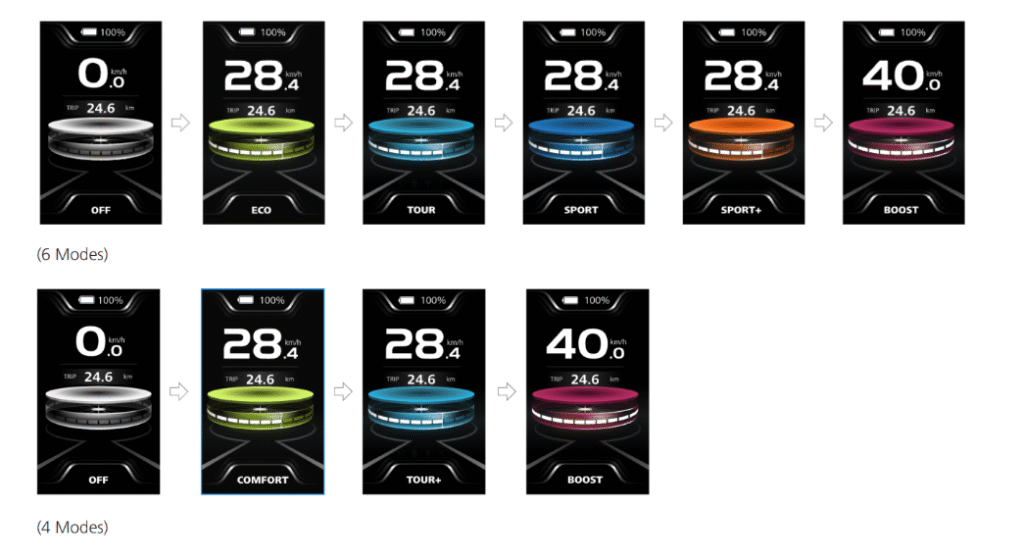
- Power-assisted mode indication (4 Modes/ 6 Modes)
- Unit of speed (km/h, mph)
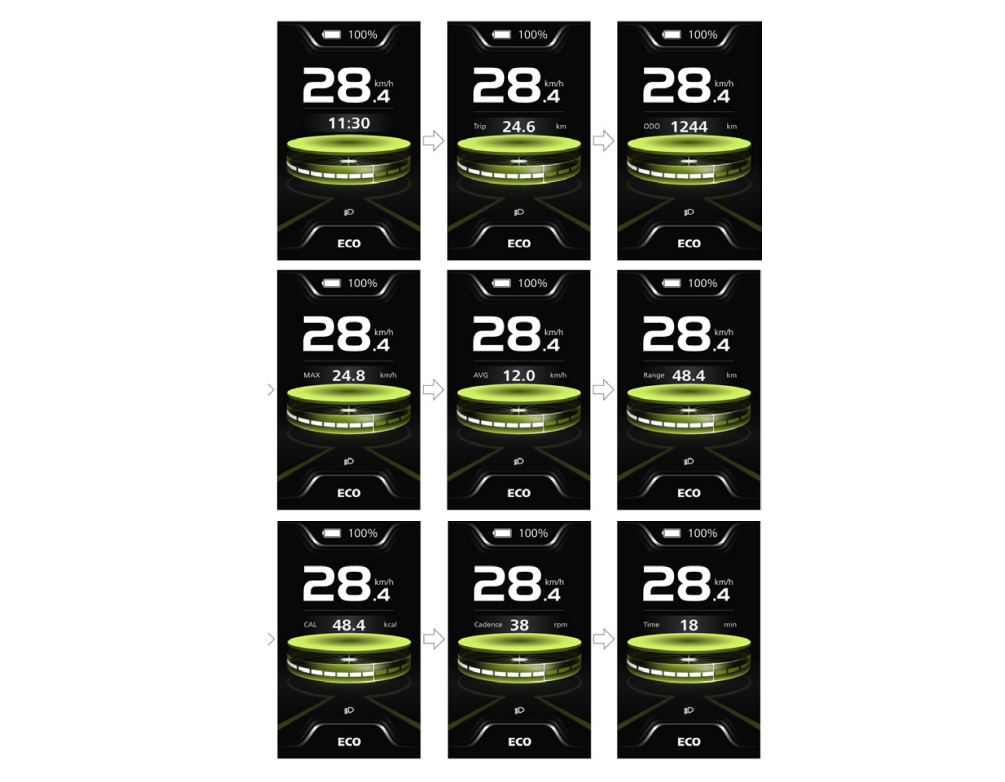
- Multifunction indication (Clock. Trip, ODO, MAX, AVG, Range, CAL, Cadence, Time)
- Icon indication (Headlight, USB, Service, Bluetooth)
KEY DEFINITION

NORMAL OPERATION
Power ON/OFF
- Press and hold “power button”(>2S) to power on the HMI, and the HMI displays the boot up LOGO.
- Press and hold “power button”(>2S) again to power off the HMI.

Power-Assisted Mode Selection
When HMI powers on, briefly press “Up” button or “Down” button (<0.5S) to select the power-assisted mode and change the output power of motor. 4 Modes or 6 Modes can be selected, but the default selection is 6 Modes of which the lowest mode is ECO and the highest mode is BOOST. The default mode is ECO after HMI powering on, mode OFF means no power assistance.
Headlight / Backlight
The headlight can be switched on manually or automatically. When the HMI powers on, the auto light function works.
Press and hold “Up” button (>2S) to turn on the headlight and reduce the brightness of backlight.
Press and hold “Up” button (>2S) again to turn off the headlight and increase the brightness of backlight.
(Note: The headlight can be automatically switched according to the ambient light, but the auto light function fails once user manually switches the headlight on/off. After restarting the HMI, the function works again.)

Walk Assistance
Note: The walk assistance can only be activated with a standing e-bike.
Briefly press “Down” button (<0.5S) until this symbol appears(red circle in the following picture). Next keep pressing the “Down” button until the walk assistance is activated and the symbol is flashing. (When the real-time speed is less than 2.5km/h, the speed indication is shown as 2.5km/h.) Once releasing the “Down” button, it will exit the walk assistance and the symbol stops flashing. If no operation within 5s, the HMI will automatically return to mode OFF.

Multifunction Selection
- Briefly press
 button (<0.5S) to switch the different function and information.
 - The position of multifunction indication displays the real-time clock (Clock) → single trip distance (TRIP, km) → total distance (ODO, km) → maximum speed (MAX, km/h) → average speed (AVG, km/h) → remaining distance (Range, km) → energy consumption (CAL, kcal) → riding cadence (Cadence, rpm) → riding time (Time, min) → cycle.
Battery Indication
HMI displays the real-time battery capacity from 100% to 0%. When the SOC is less than 5%, the indicator will blinks at a frequency of 1 Hz to alert to recharge.

Bluetooth
- This HMI is equipped with OTA function, which can update the firmware of HMI, controller, sensor and battery through the Bluetooth.
- This HMI can be connected to the Bafang Go+ APP through Bluetooth.

- The data that can be sent to the APP are as follows:
| No. | Function |
| 1 | Speed |
| 2 | Power-assisted mode |
| 3 | Battery capacity |
| 5 | Headlight state |
| 6 | TRIP |
| 7 | ODO |
| 8 | Range |
| 9 | Heartbeat (custom) |
| 10 | Calories |
| 11 | Sensor signal |
| 12 | Battery info. |
| 13 | System info. |
| 14 | Error code |

USB Charging
When the HMI is off, insert the USB cable to the charge port on the HMI, and then turn on the HMI to start charging. The maximum charge voltage is 5V and the maximum charge current is 1A. (Charging port USB: Type-C)

Service Tip
When the total mileage exceeds 5000 km, the 🔧symbol will be displayed on the HMI, reminding users to go to the after-sales store for maintenance. The function is off by default.

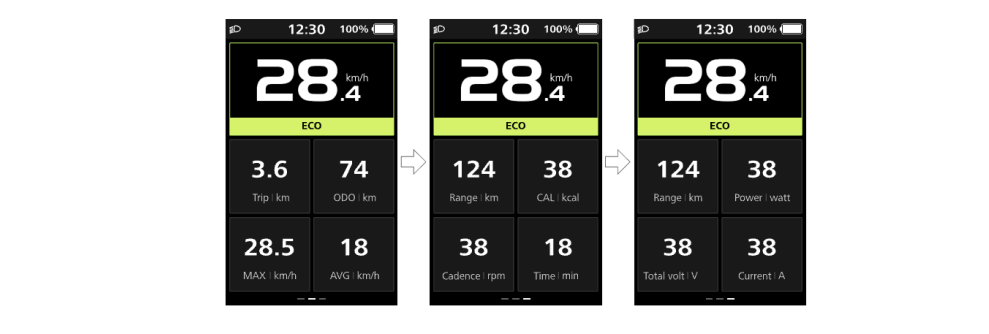
Riding Data Interface
- Double press the button (<0.5S) to enter the interface of riding data. Press the button (<0.5S) to switch the pages. Dubble press the button (<0.5S) again to return the main interface.
- When the real-time speed is less than 5 km/h and the power assisted mode is not walk assistance, press and hold the
 button (>2S) to clear the riding data of Trip, MAX, AVG, Time.
SETTINGS
“Quick settings” Interface
- When you in the main interface, press and hold the “Up” button and “Down” button (at the same time) to enter the “Quick settings” interface.
- When you in the “Quick settings” interface, press and hold the “Up” button and “Down” button (at the same time) to exit back to the main interface.
“Brightness” Set the brightness of backlight
Briefly press the “Up” button or “Down” button (<0.5S) to select “Brightness”, and briefly press the ![]() to enter the item. Then select the desired percentage from 10% to 100% by pressing the “Up” button and “Down” button, and briefly press the
to enter the item. Then select the desired percentage from 10% to 100% by pressing the “Up” button and “Down” button, and briefly press the ![]() button (<0.5S) to save and exit back to the “Quick settings” interface.
button (<0.5S) to save and exit back to the “Quick settings” interface.
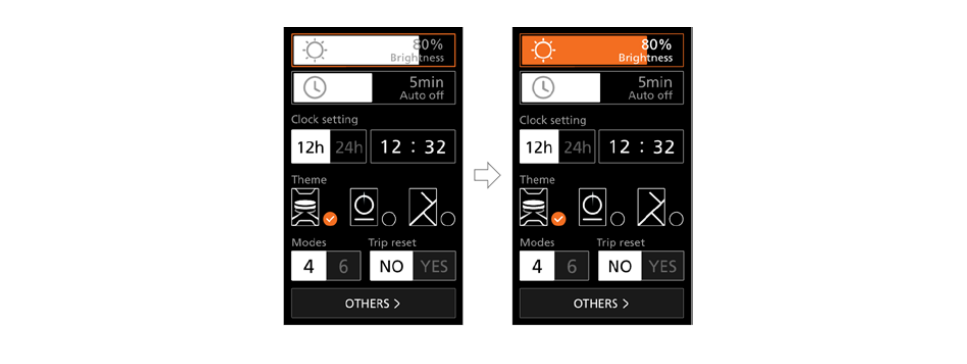
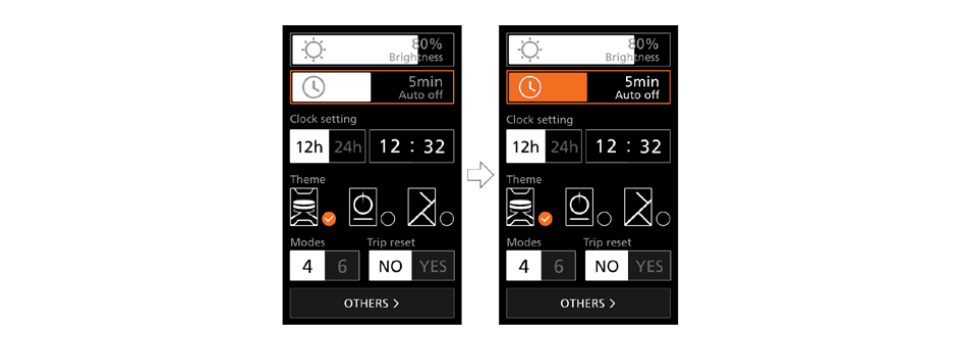
“Auto off” Set automatic off time
Briefly press the “Up” button or “Down” button (<0.5S) to select “Auto off”, and briefly press the ![]() to enter the item. Then select the automatic off time as “OFF”/“1”/“2”/“3”/“4”/“5”/“6”/“7”/“8”/“9” with the “Up” button or “Down” button. Once you have chosen your desired selection, press the
to enter the item. Then select the automatic off time as “OFF”/“1”/“2”/“3”/“4”/“5”/“6”/“7”/“8”/“9” with the “Up” button or “Down” button. Once you have chosen your desired selection, press the ![]() (<0.5S) to save and exit back to the “Quick settings” interface.
(<0.5S) to save and exit back to the “Quick settings” interface.
Note: “OFF” means the “Auto off” function is off.
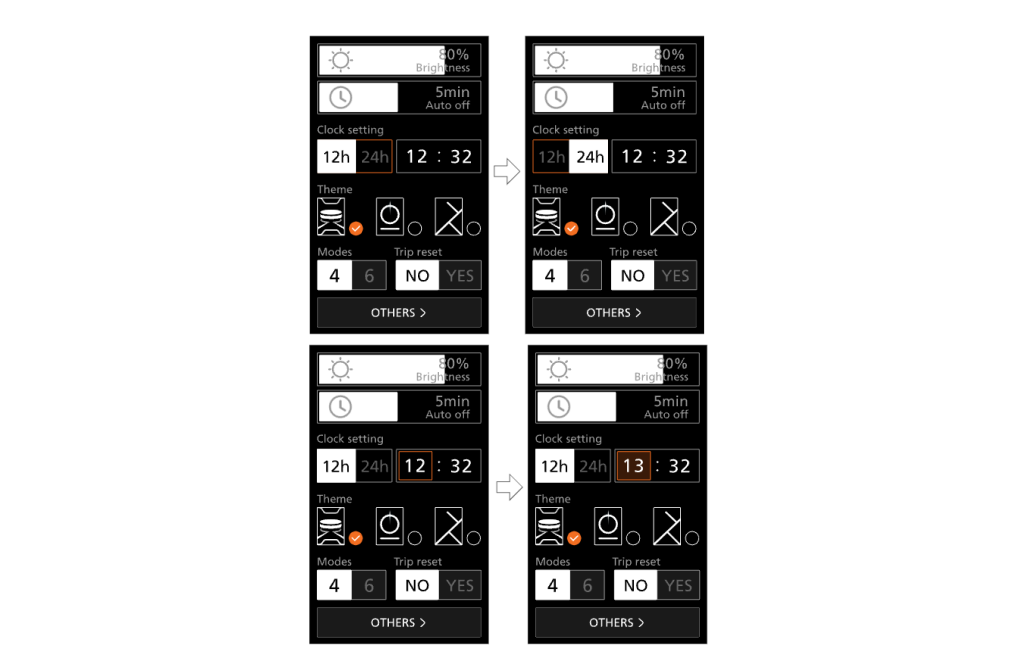
“Clock setting” Set the clock
Briefly press the “Up” button or “Down” button (<0.5S) to enter the “Time format” setting, and briefly press the ![]() to select “12h” or “24h”.
to select “12h” or “24h”.
Briefly press the “Up” button or “Down” button (<0.5S) to select the “Clock setting“ item, briefly press the ![]() to enter the item. Then set the accurate time by pressing the “Up” button or “Down” button, and briefly press the
to enter the item. Then set the accurate time by pressing the “Up” button or “Down” button, and briefly press the ![]() (<0.5S) to save and exit back to the “Quick settings” interface.
(<0.5S) to save and exit back to the “Quick settings” interface.
“Theme” Set the theme
Briefly press the “Up” button or “Down” button (<0.5S) to select the desired “Theme”, and briefly press the ![]() to save the selection.
to save the selection.
“Modes” Set the power-assisted modes
Briefly press the “Up” button or “Down” button (<0.5S) to enter the “Modes” setting, and briefly press the ![]() to select “4 Modes” or “6 Modes”.
to select “4 Modes” or “6 Modes”.
“Trip reset” Reset the single-trip
Briefly press the “Up” button or “Down” button (<0.5S) to enter the “Trip reset” setting, and briefly press the ![]() to select “YES” or “NO”.
to select “YES” or “NO”.
“Display settings” Interface
When you in the “Quick settings” interface, briefly press the ![]() or
or ![]() button (<0.5S) to select the “OTHERS” and enter the “Display settings” interface.
button (<0.5S) to select the “OTHERS” and enter the “Display settings” interface.
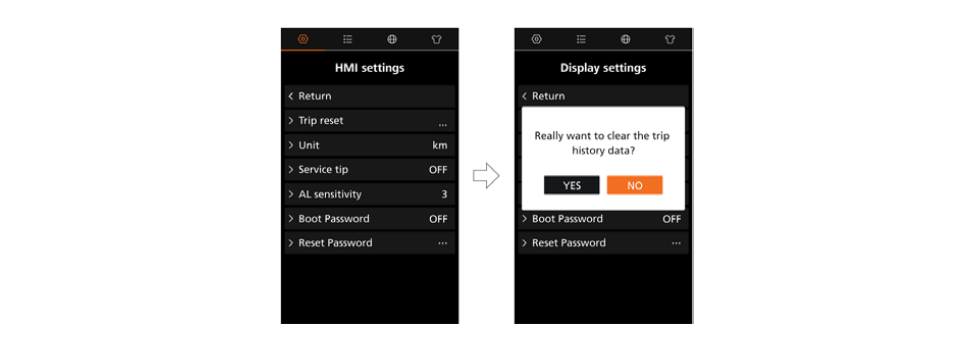
“Trip reset” Reset the single-trip
Briefly press the ![]() or
or ![]() button (<0.5S) to select the “Trip reset” item, and briefly press the
button (<0.5S) to select the “Trip reset” item, and briefly press the ![]() button to enter the item. Then select “YES”/“NO” (“YES”- to clear, “NO”-no operation) with the
button to enter the item. Then select “YES”/“NO” (“YES”- to clear, “NO”-no operation) with the ![]() or
or ![]() button and briefly press the
button and briefly press the ![]() button (<0.5S) to save and exit back to the “Display settings” interface.
button (<0.5S) to save and exit back to the “Display settings” interface.
Note: The riding time (Time), average speed (AVG) and maximum speed (MAX) will be reset simultaneously when you reset TRIP.
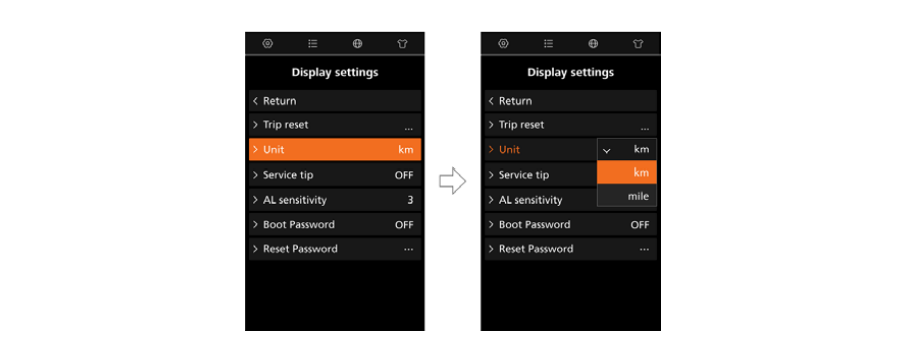
“Unit” Select the mileage unit
Briefly press the ![]() or
or ![]() button (<0.5S) to select the “Unit” item, and briefly press the
button (<0.5S) to select the “Unit” item, and briefly press the ![]() button to enter the item. Then select “km”/“mile” with the
button to enter the item. Then select “km”/“mile” with the![]() or
or ![]() button and briefly press the
button and briefly press the ![]() button (<0.5S) to save and exit back to the “Display settings” interface.
button (<0.5S) to save and exit back to the “Display settings” interface.
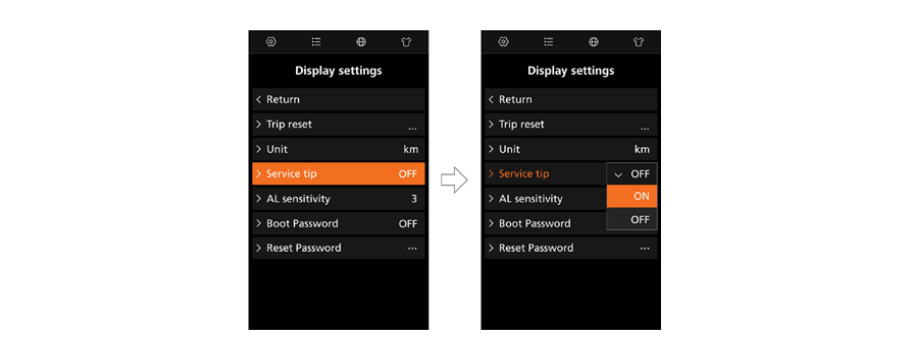
“Service tip” Set the service tip
Briefly press the ![]() or
or ![]() button (<0.5S) to select the “Service tip” item, and briefly press the
button (<0.5S) to select the “Service tip” item, and briefly press the ![]() button to enter the item. Then select “ON”/“OFF” with the
button to enter the item. Then select “ON”/“OFF” with the ![]() or
or ![]() button and briefly press the
button and briefly press the ![]() button (<0.5S) to save and exit back to the “Display settings” interface.
button (<0.5S) to save and exit back to the “Display settings” interface.
Note: The default setting is OFF. If the ODO is more than 5000 km, the “Service tip” indication will flash.
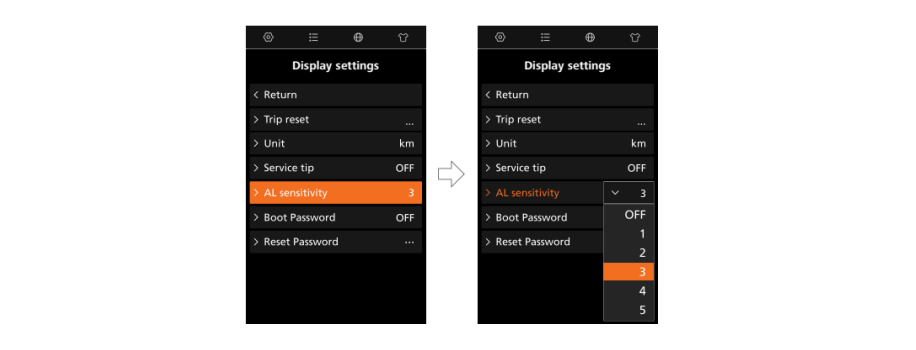
“AL Sensitivity” Set light sensitivity
Briefly press the ![]() or
or ![]() button (<0.5S) to select the “AL sensitivity” item, and briefly press the
button (<0.5S) to select the “AL sensitivity” item, and briefly press the ![]() button to enter the item. Then select the level of the light sensitivity as “OFF”/“1”/ “2”/“3”/“4”/“5” with the
button to enter the item. Then select the level of the light sensitivity as “OFF”/“1”/ “2”/“3”/“4”/“5” with the ![]() or
or ![]() button and briefly press the
button and briefly press the ![]() button (<0.5S) to save and exit back to the “Display settings” interface.
button (<0.5S) to save and exit back to the “Display settings” interface.
Note: “OFF” means the light sensor is off. Level 1 is the weakest sensitivity and level 5 is the strongest sensitivity.
“Boot Password” Turn on/off the password fuction
- Briefly press the
 or button (<0.5S) to select the “Boot Password” item, and briefly press the button to enter the item. Then select the 4-digit number as “0”/“1”/“2”/“3”/“4”/“5”/“6”/“7”/“8”/“9”with the or button. After setting, select the “YES” by briefly pressing the button (<0.5S) to save and exit back to the “Display settings” interface.
 - After back to the “Display settings” interface, briefly select “ON”/“OFF” with the or button and briefly press the button (<0.5S) to save and exit back to the “Display settings” interface.
Note: The default password is 0000, and the default setting is OFF.
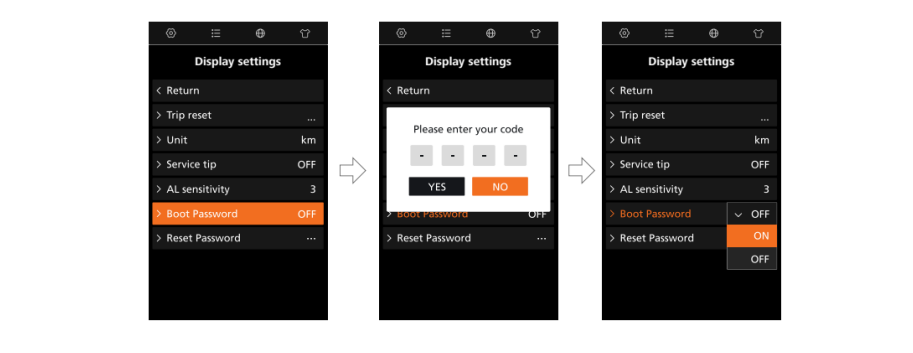
After successful setting, the HMI will request to enter the password when powering on. Select the 4-digit number as “0”/“1”/“2”/“3”/“4”/“5”/“6”/“7”/“8”/“9”with the ![]() or
or ![]() button, then enter the main interface.
button, then enter the main interface.

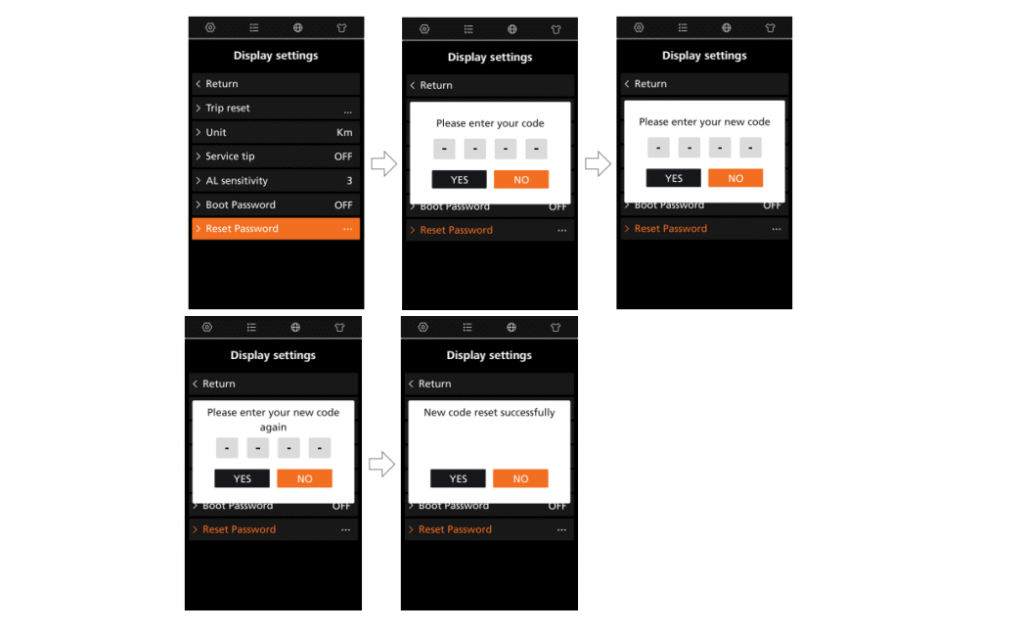
“Reset Password” Reset the boot password
Briefly press the ![]() or
or ![]() button (<0.5S) to select the “Reset Password” item, and briefly press the
button (<0.5S) to select the “Reset Password” item, and briefly press the ![]() button to enter the item. Enter the 4-digit old password with the
button to enter the item. Enter the 4-digit old password with the ![]() or
or ![]() button, then enter the new password and confirm the new password. After setting, select the “YES” by briefly pressing the
button, then enter the new password and confirm the new password. After setting, select the “YES” by briefly pressing the ![]() button (<0.5S) to save and exit back to the “Display settings” interface.
button (<0.5S) to save and exit back to the “Display settings” interface.
“Information” Interface
Note: All information here cannot be changed, it is to be viewed only.
“Wheel size” & “Speed limit”
After entering the “Information” page, you can see “Wheel size –inch” and “Speed limit –km/h” directly.

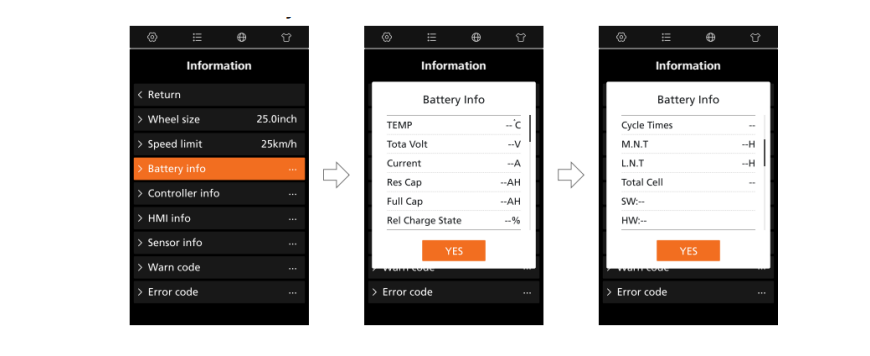
“Battery info”
Briefly press the ![]() or
or ![]() button (<0.5S) to select “Battery info”, and briefly press the
button (<0.5S) to select “Battery info”, and briefly press the ![]() button to enter, then briefly press the
button to enter, then briefly press the ![]() or
or ![]() button to view the battery information.
button to view the battery information.
Note: If the battery doesn’t have communication function, you won’t see any data from battery.
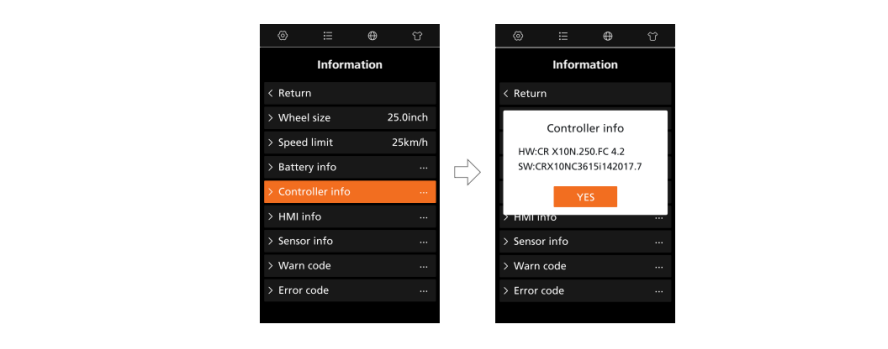
“Controller info”
- Briefly press the or button (<0.5S) to select ”Controller info”, and briefly press the button to view the hardware version and software version.
- Press the button (<0.5S) again to exit back to the “Information” interface.
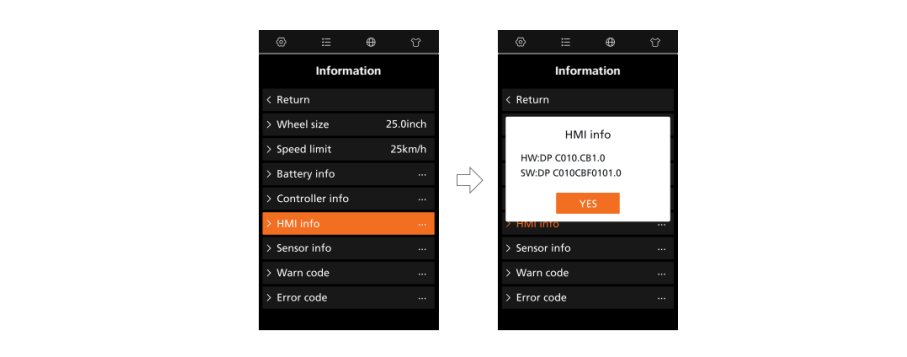
“HMI info”
- Briefly press the or button (<0.5S) to select ”HMI info”, and briefly press the button to view the hardware version and software version.
- Press the button (<0.5S) again to exit back to the “Information” interface.
“Sensor info”
- Briefly press the or button (<0.5S) to select ”Sensor info”, and briefly press the button to view the hardware version and software version.
- Press the button (<0.5S) again to exit back to the “Information” interface.
NOTE: If your e-bike doesn’t have torque sensor, “–” will be displayed.

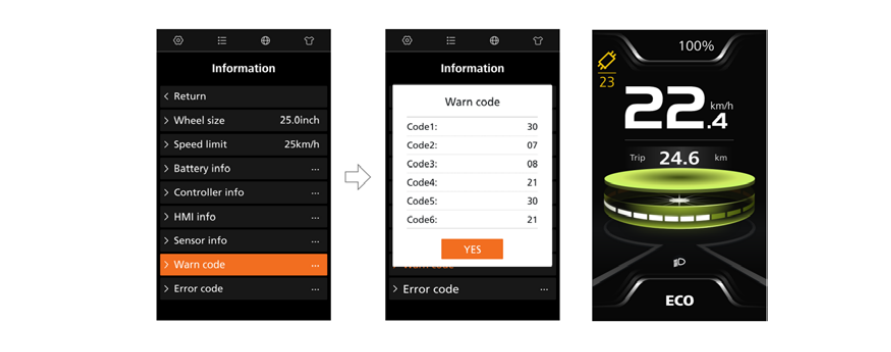
“Warn code”
- Briefly press the or button (<0.5S) to select ”Warn code”, and briefly press the button to view the message of warn code.
- Press the button (<0.5S) again to exit back to the “Information” interface.
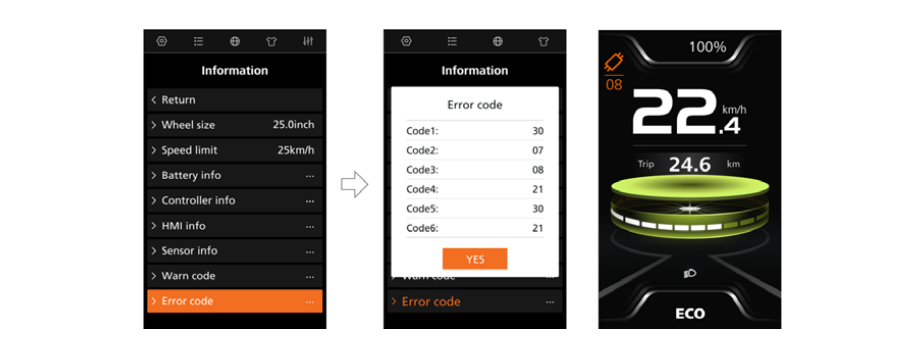
“Error code”
- Briefly press the or button (<0.5S) to select ”Error code”, and briefly press the button to view the message of error code.
- Press the button (<0.5S) again to exit back to the “Information” interface.
“Language” Interface
When you in the “Language” interface, briefly press the ![]() or
or ![]() button (<0.5S) to select the desired language as “English”/”Deutsch”/”Nederlands”/”Français”/”Italiano”/”Čeština” and briefly press the
button (<0.5S) to select the desired language as “English”/”Deutsch”/”Nederlands”/”Français”/”Italiano”/”Čeština” and briefly press the ![]() button to save the selection.
button to save the selection.

“Theme” Interface
When you in the “Theme” interface, briefly press the ![]() or
or ![]() button (<0.5S) to select the desired theme as “Sporty”/”Technology”/”Fashion” and briefly press the
button (<0.5S) to select the desired theme as “Sporty”/”Technology”/”Fashion” and briefly press the ![]() button to save the selection.
button to save the selection.

Navigation Mapping
The function is enabled when the user uses the HMI with BAFANG GO+. When the user starts navigation with the app, the navigation route will map to the HMI in real time. For detailed operation, see BAFANG GO+ App Operation Manual.

ERROR CODE DEFINITION
The HMI can show the faults of Pedelec. When a fault is detected, one of the following error codes will be indicated too.
Note: Please read carefully the description of the error code. When the error code appears, please first restart the system. If the problem is not eliminated, please contact us.